To start the day, Chet and the farm manager Doug walked us to the 'Breeder House' where chickens, both hens and roosters, are put into a large room to copulate and produce expensive, extra-special, and fertilized eggs that can be used to make more generations of the same genetic line. When we circled up in the room outside of the rooms these chickens were held in, Chet explained to the class that we should be accustomed to the area that these chickens reside in so collecting eggs should not be too difficult. He went on to say that the Colombian chickens (all white) are very flighty and tend to lay on their eggs in bunches so picking up and moving chickens may need to occur to collect their eggs. Moreover, Chet stated that we need to keep an eye out for the roosters as they can be very protective of their females. Finally, Chet explained that after collecting the eggs, a chicken farmer will count the total, record that number on a sheet with egg totals for the day, then label a couple of the eggs so that eggs do not get mixed up during the sorting process. With that, he divided the class up into 4 separate groups, handing each group a basket, and sent the groups on their way. All groups had a relatively easy time collecting the eggs except in the cross-bred flock where 1-2 students each week were kicked by the spurs of the roosters in this pen/room. Those roosters sure loved their women.
Following the breeder house, Doug and Chet led us back to the cage house where we were taught how to properly clean and store eggs. Chelsie Parr, the graduate researcher and manager of the poultry farms, explained to the class the process of cleaning and handling eggs at this point. First, eggs are 'belled' which done by taking two eggs and gently tapping the small, pointy-ish ends of the eggs together. If the shell quality is good (not thin) then the sound produced would be that of a bell, like a 'tink-tink-tink' sound. If the shell quality is poor (thin) then a dull sound will be produced and in the event of this unique sound, you must keep tapping them together, with a little more force, until the egg with the thin shell breaks open. The thick-shelled egg then gets cleaned which is done by removing any dirt, bird poop, or feed from the eggs by using a small scrubber. Once the egg(s) is/are clean, they are placed into an eggs flat, with the points facing down, and then move on to the next egg.
 Now, it is important to explain why eggs are not cleaned with soap and water, and as well as why eggs are placed pointed-end down. First, eggs cannot be clean with soap and water because an egg shell is highly porous and any dirt that is on the shell will dissolve with the water and then be absorbed into the egg. This is proven very well when eggs are specific density tested in salt water. If one were to crack open and eat one of these eggs that have been specific density tested, one would find it to be extremely salty tasting. Second, eggs are pointed face-down so that the air cell in the egg is able to expand as it has more room to do so on the opposite, larger end of the egg.
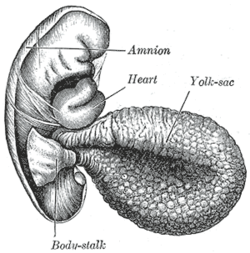
After cleaning, the eggs, now in the flats, are taken into the cooler room where they are placed into their respective boxes to be cooled and stored overnight. Moreover, because these eggs are from the breeder flock, chicken farmers turn these fertile eggs over so they do not set/prepare to incubate and keeping the eggs moving is a great way to prevent this from occurring. After Chet explained this, Dr. Parsons educated the class on the differences between a fertile and infertile egg. Dr. Parsons grabbed two eggs, cracked them open, and pointed out a small white spot in the middle of the yolks of each egg. He said that this was called the 'germ cell' and an infertile egg will have a small, white dot in the middle of the yolk whereas a fertile egg will have a larger white dot that is slightly cloudy.
 Following this demonstration, Dr. Parsons proceeded to break open a double-yolk egg (very large egg). He told the class that this happens rarely in single birds, but do to the large flock at the poultry farms, it is a regular occurrence. He further explained that eggs like these usually do not hatch even though books state that it is possible to grow this egg and have both birds survive. Dr. Parsons told the class that the book may be right in theory, however, what usually happens is one chick out-competes the other embryo and takes over the egg. Lastly, Dr. Parsons showed us the odd and misshapen eggs that would not go to market. These eggs varied in size, shell quality, and weird appendages, but most were very obvious as to why they would not sell; they were gross and not something people would pay money for to eat.
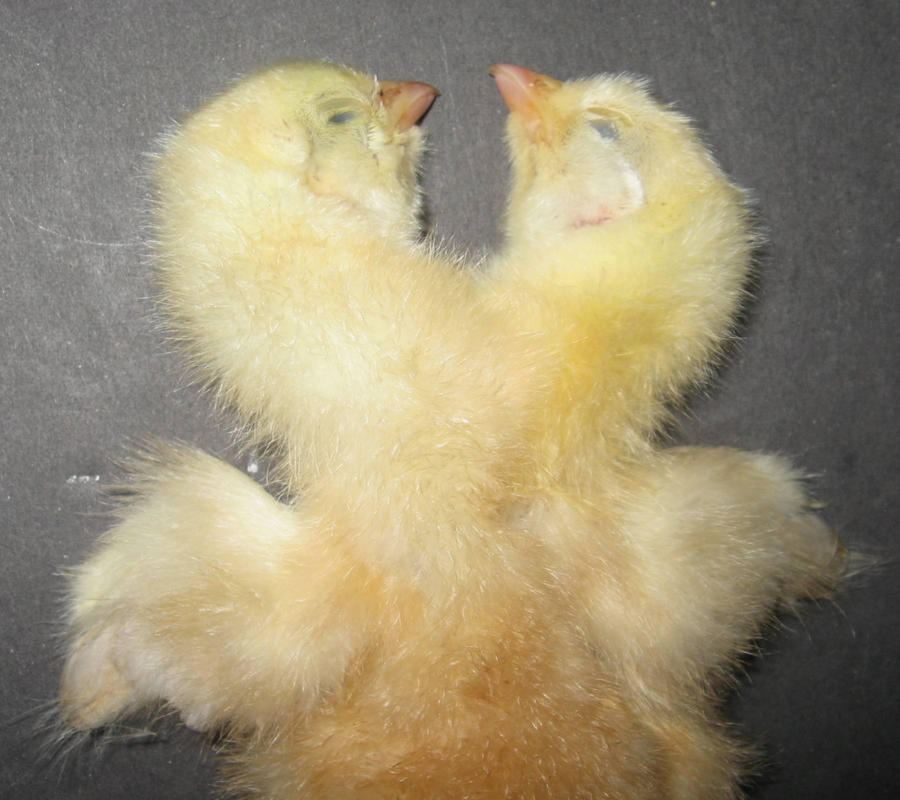
 Next, the class was brought to the chick lab to look at embryological issues in hatching chicks, as well as how to candle an egg. Students gathered around two large, rectangular tables and two very large crates were removed from the incubator and placed on each table. In these crates were day old chicks that had just been hatched and needed to be sorted. Pam Utterback now took over and explained that the proper way to sort any chick is to vent them (express their anus) and used a magnifying glass to spot whether or not there is another hole. If there is one, then that chick would be female as they have another hole used to produce the egg. Fortunately for the class, this difficult procedure was easily avoided as the chicks being sorted were sex-linked and were genetically reproduced to be able to sort them by the color of their feathers. The males were a light and bright yellow whereas the females were a dark yellow. Moreover, Pam showed us that the females, as with most species, grow faster when young and thus have larger/longer feathers on their wings as compared to the males who do not have these longer, adult-like feathers.
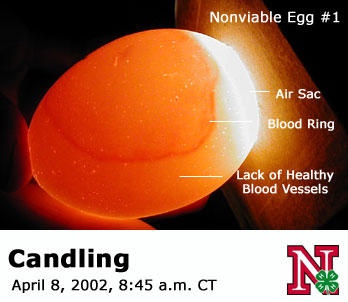
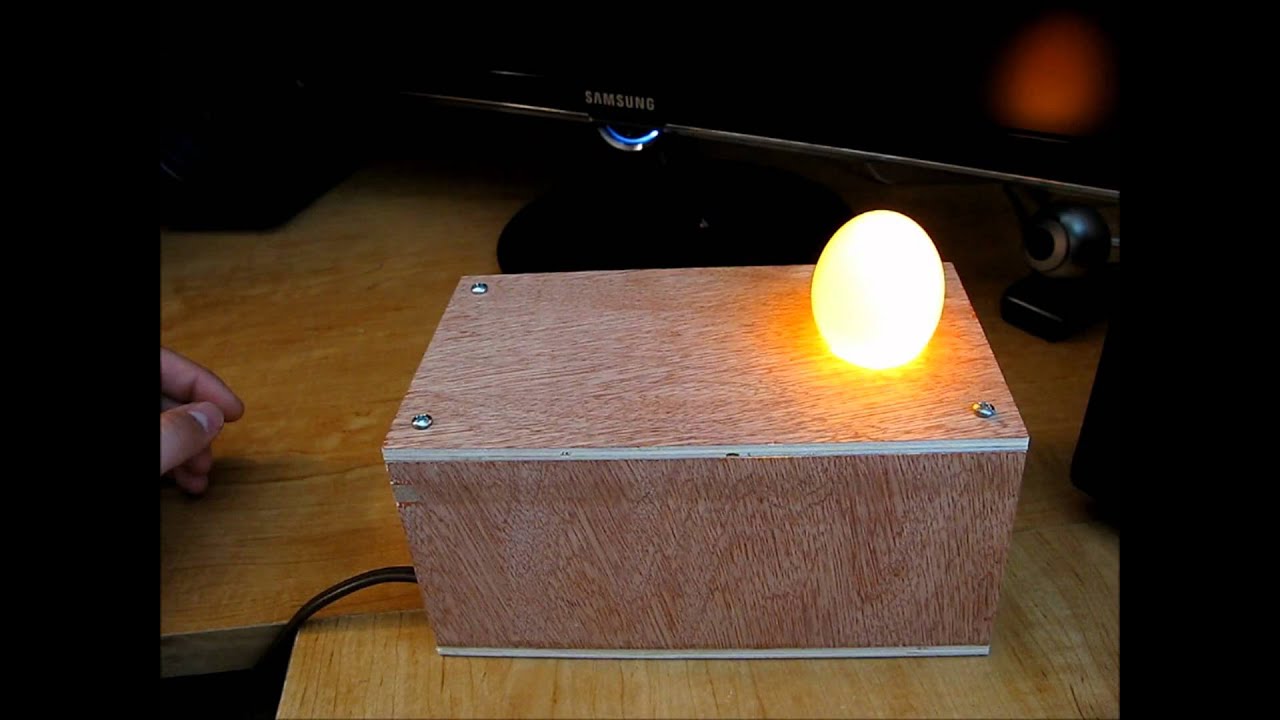 Once the chicks were sorted by color, they were removed and replaced with a large, wooden box. Pam then brought out a couple flats of eggs and placed them onto trays that were set on top of this wooden box. Inside this box was a light, and when this box was plugged in, mass candling eggs could occur. Pam turned the box on and told the class that they were to look for poor-quality eggs which were those that glowed red/were lighter. The reddish tinge to the eggs means that these eggs did not set correctly, and thus have nothing growing inside of them. The darker eggs mean the opposite, and because this lab students were cracking open the reddish tinged eggs, making a mistake here means students could potentially open up a fertilized, and growing egg with a live chick inside.
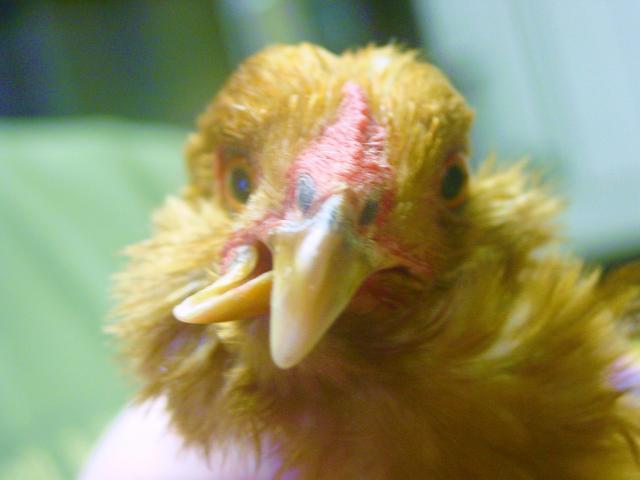 After the eggs were sorted and candled, more flats of eggs were brought out along with eight glass pyrex dishes. Students were now instructed to break open all of these eggs and to look for anything special such as blood spots, aborted chicks (chicks that had a problem occur during the incubation/growing period), as well as mutated chicks (chicks with multiple appendages, cross-beaks, or other deformities). When I took this class a year ago, my class found lots of mutated chicks, however, this year, all three groups I assisted teaching found only two mutations: A brain out (self-explanatory) and a chick with four feet.
Following this uneventful egg breaking, Chet ended the day/lesson by showing us his collection of weird things that have come from this part of the lab. He had chicks with brains out, guts out, multiple feet, completely crossed beaks, and tons of other things. Personally, I thought the coolest thing he had collected over the years was the double-headed chick. Chet explained that this is extremely rare and would have been even more rare if it hatched. His famous last words of that day were, "Man, if this chick would have hatched I would have been a millionaire and would not be working here anymore."